
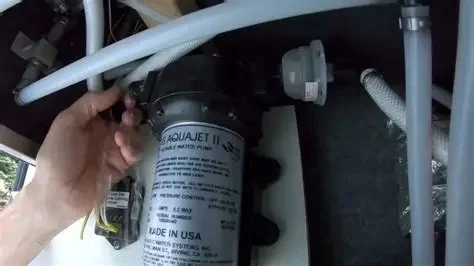
How to Replace an RV Water Pump: Step-by-Step Instructions
- Gathering Tools and Materials
- Locating the RV Water Pump
- Removing the Old Water Pump
- Installing the New Water Pump
- Testing the New Water Pump and Troubleshooting
As any seasoned RV owner knows, maintaining your RV’s water system is essential for a comfortable and functional travel experience. One of the most common issues you may face is a failing water pump, which can lead to a lack of water pressure and disrupt your daily activities. Fortunately, replacing an RV water pump is a manageable task that can be done with the right tools and a little know-how. In this guide, we’ll walk you through the steps for replacing your RV water pump, including troubleshooting tips and best practices to ensure your system works flawlessly.
Gathering Tools and Materials
Before you start the replacement process, it’s important to gather all the necessary tools and materials to make the job easier. Here’s what you’ll need:
- New water pump: Ensure the replacement water pump is compatible with your RV model.
- Wrenches: You’ll need a set of adjustable wrenches to loosen and tighten plumbing connections.
- Plumbing tape: To prevent leaks, use Teflon tape on any threaded connections.
- Screwdrivers: A flathead and Phillips screwdriver will help with securing the pump.
- Drip pan or towels: To catch any water spillage during the process.
- Bucket or container: For draining excess water from the lines.
- Flashlight: Use a flashlight to inspect tight spaces under the RV.
Locating the RV Water Pump
The next step is to locate the water pump in your RV. Typically, the water pump is located under the sink, near the fresh water tank, or inside a compartment that houses the plumbing system. If you're unsure of the location, refer to your RV’s manual or check online for specific details about your model.
Once you’ve located the pump, you’ll likely need to remove a few panels or coverings to access it. Be sure to work in a well-lit area and keep the surrounding space clear to avoid accidents.
Removing the Old Water Pump
Before you remove the old pump, make sure to turn off the water supply and disconnect any power sources. Follow these steps:
- Turn off the water supply: Ensure that the RV’s water supply is turned off to avoid any leaks or flooding during the process.
- Disconnect the water lines: Use your wrenches to loosen the water supply and discharge lines connected to the pump. Be cautious of any residual water that may still be in the pipes.
- Disconnect the power: Unplug the water pump from its power source. Some models may have a quick-connect electrical plug, while others may need to be unscrewed or disconnected manually.
- Remove the old pump: Use a screwdriver to remove any screws securing the pump. Gently lift the old pump from its location and set it aside.
Installing the New Water Pump
Now that the old pump is removed, it’s time to install the new one. Follow these steps:
- Place the new pump: Position the new pump in the same location as the old one. Ensure it is securely placed and aligns with the water lines.
- Connect the water lines: Attach the water supply and discharge lines to the new pump, ensuring they are tightly secured. Use Teflon tape on threaded connections to prevent leaks.
- Reconnect the power: Plug the new pump into its power source, ensuring that the electrical connections are secure and insulated.
- Secure the pump: Use screws or other fasteners to secure the pump in place. Make sure it is firmly attached to prevent movement or vibration during operation.
Testing the New Water Pump and Troubleshooting
Once the new pump is installed, it’s time to test it. Here’s how to ensure everything is working properly:
- Turn on the water supply: Open the water supply and allow water to flow through the lines. Check for any leaks at the connections and tighten them if necessary.
- Power on the pump: Turn on the RV’s power supply and activate the water pump. You should hear the pump running, and water should start flowing from your taps.
- Check water pressure: Turn on the faucet and check the water pressure. It should be strong and steady. If the pressure is weak, there may be air in the system that needs to be flushed out.
- Troubleshoot if necessary: If the pump isn’t working, check the power connections, water lines, and ensure there are no blockages or kinks in the hoses. Refer to the manufacturer’s manual for troubleshooting advice.
By following these steps, you can successfully replace the water pump in your RV and ensure that your water system operates efficiently. If you’re looking for RV maintenance products or need further assistance, be sure to visit Camping Rural for a range of helpful resources.




 Elko Schutte Carpenter Trailer4.0 (9 reviews)
 Deep Creek Campground4.0 (7 reviews)
 Tent Pads5.0 (2 reviews)
 Cedar Valley Campground3.0 (118 reviews)
 Waterfall Glen Youth Campground4.0 (11 reviews)
 Rancho Pines Campground4.0 (94 reviews)
 10 Must-Visit Campgrounds in the Midwest for Your Next Outdoor Adventure
 Romantic Camping Spots for Couples: Perfect Getaways in Nature
 Ultimate Guide to Off the Grid Camping in Remote Locations
 How to Cook Over a Campfire Safely for an Enjoyable Outdoor Experience
 Vanlife in Winter: My Personal Experience Living on the Road
 From City to Camp: My Journey to Nature and What I Learned