
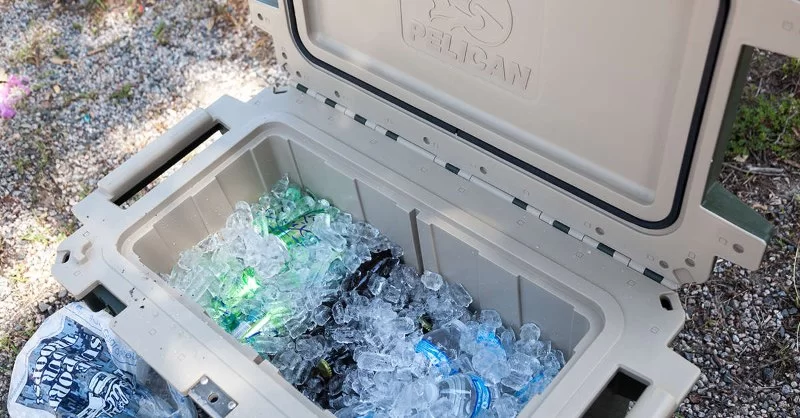
- pre-chill-strategy-matters-most - Why a Pre-Chill Strategy Matters Most for Ice Retention
- ice-type-and-layering-technique - Choosing the Right Ice Type and Layering for Maximum Efficiency
- packing-organization-keeps-cooler-cold - Packing Organization: How Layout Affects Cooler Temperature
- food-order-access-frequency - Order of Food and How Often You Open the Cooler
- location-shade-and-cooler-positioning - Shade, Surface, and Cooler Positioning: External Factors You Control
- real-trip-examples-from-campers - Real Trip Examples and Smart Moves from Seasoned Campers
1. Why a Pre-Chill Strategy Matters Most for Ice Retention
If there’s one step that makes or breaks how long your ice lasts on a long camping trip, it’s pre-chilling your cooler. Most people skip this—and regret it by Day 2 when their drinks are floating in a watery mess. A cooler that starts warm burns through your ice just trying to lower its internal temperature.
At least 24 hours before your trip, store the empty cooler in a cool, shaded spot. Fill it with sacrificial ice or frozen water bottles to bring down its core temp. Only when you’re ready to pack your real food should you remove the placeholder ice. This trick alone can extend ice retention by up to 24 hours, especially in high-end rotomolded coolers.
At Camping Rural, we advise all campers—whether using YETI-style or budget models—to invest in a pre-chill strategy. It’s low effort, high reward.
2. Choosing the Right Ice Type and Layering for Maximum Efficiency
2.1 Block Ice vs. Cubed Ice: Why It Matters
Block ice melts slower than cubed ice, making it ideal for long-term cold storage. Cubed or crushed ice, however, fills in gaps better and cools items more quickly. A layered approach is best: place a block ice base on the bottom and fill gaps around food and drinks with cubed ice.
2.2 Freeze Water Bottles and Use Ice Packs
Frozen water bottles are great for two reasons—they keep your cooler cold and provide drinking water as they thaw. High-performance ice packs, like those sold at Camping Rural, can be reused and strategically placed between layers. Don’t forget: ice on top of your food is more effective than ice below, because cold air sinks.
3. Packing Organization: How Layout Affects Cooler Temperature
An organized cooler is a colder cooler. Group items by usage frequency and type. Pack perishable proteins and dairy near the bottom—where temps are coldest—and keep snacks and drinks near the top. Consider using labeled dry bags or storage bins to avoid digging and exposing the interior to warm air.
A great tip from a Camping Rural customer: separate meals into gallon freezer bags, each labeled by day. “That way I grab one bag and don’t disturb anything else,” she said. Smart organization reduces open time and preserves internal cold zones.
4. Order of Food and How Often You Open the Cooler
Your packing order should match your meal plan. Day-one food should be on top, with day-five items buried at the bottom where they stay undisturbed and cold. Every time you open your cooler, you introduce warm air and trigger ice melt.
Pro campers often use two coolers: one for frequent-access items (like drinks) and one for long-term food storage. If you only have one, designate a “drink zone” near the top to minimize searching. If your group includes kids, prep a labeled "snack box" at the top so they can grab what they need without rummaging.
5. Shade, Surface, and Cooler Positioning: External Factors You Control
No matter how well you’ve packed it, your cooler can only fight so much heat from the outside. Always keep it out of direct sunlight. Shade from trees, tents, or even a DIY reflective cover can make a major difference.
Avoid placing the cooler on hot surfaces like asphalt or metal truck beds. Elevating it slightly on a crate or foam pad reduces heat transfer from below. Keep the drain plug closed during travel but consider cracking it slightly if meltwater starts warming food inside.
At Camping Rural, we’ve seen campers use space blankets or reflective bubble wrap to build custom cooler covers. One user claimed their cooler stayed ice-cold for five full days under 85°F weather using this method.
6. Real Trip Examples and Smart Moves from Seasoned Campers
On a six-day desert camping trip in Utah, one Camping Rural customer shared how they managed to retain ice for five days using a combo of smart layering and reduced access. “We made a rule: cooler only opens 3 times a day—breakfast, lunch, dinner. That alone saved us,” they wrote in a review.
Another camper in the Smokies packed their cooler using frozen chili, stew, and curry, stacked in vacuum-sealed bags. “As the frozen meals thawed, they helped keep the cooler temperature low. We ate them in reverse order,” she said. Ingenious planning turned their food into part of the cooling strategy.
Whether you’re planning a weekend family escape or a weeklong backcountry trip, how you pack your cooler directly affects your food safety, comfort, and convenience. At Camping Rural, we specialize in gear and strategies that work in real-life outdoor scenarios—not just in theory.
 Clearbrook City Park Campground3.0 (15 reviews)
 MC-2 River Campsite0.0 (0 reviews)
 Hillcrest Mobile Home Park2.0 (8 reviews)
 Peg Mill Shelter4.0 (10 reviews)
 Village Acres Mobile Home Court4.0 (12 reviews)
 Trails End RV Park4.0 (278 reviews)
 10 Must-Visit Campgrounds in the Midwest for Your Next Outdoor Adventure
 Romantic Camping Spots for Couples: Perfect Getaways in Nature
 Ultimate Guide to Off the Grid Camping in Remote Locations
 How to Cook Over a Campfire Safely for an Enjoyable Outdoor Experience
 Vanlife in Winter: My Personal Experience Living on the Road
 From City to Camp: My Journey to Nature and What I Learned