
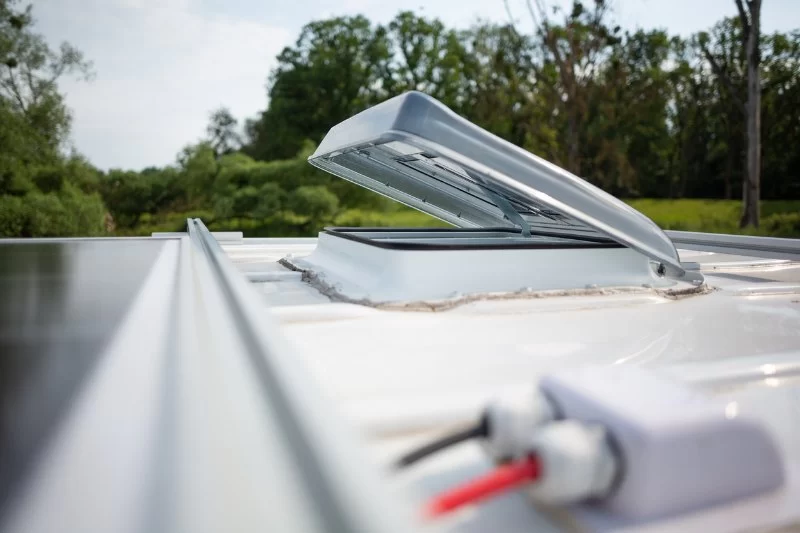
1. Understanding the Common Causes of RV Roof Leaks
If you're an RV owner, you know how essential it is to keep your vehicle in top shape, especially when it comes to the roof. A leaking RV roof can be a significant problem, causing water damage, mold, and mildew. Understanding the causes of these leaks is the first step to preventing and fixing them.
Some of the most common causes of RV roof leaks include:
- Cracked Seals: The seals around vents, skylights, and air conditioning units can deteriorate over time due to sun exposure and temperature fluctuations.
- Debris Accumulation: Leaves, dirt, and twigs can collect on your RV roof, leading to water pooling and eventually causing leaks.
- Worn Roof Materials: The material of your RV roof, whether rubber or fiberglass, can wear out, crack, or degrade, leading to leaks.
- Improper Installation: If the roof was not installed properly, it could be prone to leaks from the start.
- Age: Over time, exposure to the elements can naturally cause the roof to become less effective at repelling water.
By recognizing these potential issues, you can take proactive steps to repair or prevent leaks from occurring in the future.
2. Steps to Identify the Source of the Leak
Before diving into the repair process, it’s crucial to identify the exact location of the leak. Finding the source can sometimes be tricky, as water can travel along the roof before dripping down inside. Here’s how to pinpoint the issue:
- Inspect the Roof Visually: Start by carefully examining the roof for any visible cracks, gaps, or damage. Pay close attention to areas where vents or equipment are mounted.
- Check Seals and Joints: Inspect the seals around windows, doors, vents, and skylights. If the caulk is cracked, missing, or loose, this could be the cause of the leak.
- Use Water Testing: If you can’t spot the leak with a visual inspection, you may need to perform a water test. Use a hose to gently spray different sections of the roof while someone else is inside the RV to spot any leaks.
Once you identify the source of the leak, you can proceed with the repair process.
3. Effective Sealing Methods to Repair Your RV Roof
Once you've identified the source of the leak, it’s time to repair it. Fortunately, there are several sealing methods that can effectively fix most RV roof leaks.
3.1 Applying Roof Sealant
Roof sealants are one of the most effective ways to repair a leaking RV roof. There are various types of sealants available, including rubberized and silicone-based sealants. These are designed to adhere to the roof material and provide a waterproof barrier.
Here's how to apply it:
- Clean the area around the leak thoroughly to remove any dirt, debris, or old sealant.
- Apply the sealant generously to the affected area, making sure to cover the cracks or gaps completely.
- Use a putty knife to smooth the sealant and ensure it bonds well to the surface.
- Allow the sealant to dry completely before using your RV again.
3.2 Replacing Damaged Roofing Material
If the roof material itself is damaged, you may need to replace it. Rubber roofs are common in RVs and can be patched with specialized rubber roof repair kits. For fiberglass roofs, you can use fiberglass repair kits that include resin and hardener.
To replace or patch damaged roofing material:
- Clean the damaged area and remove any loose material.
- If patching, apply the repair material according to the kit instructions.
- If replacing, carefully remove the old material, apply adhesive, and install the new roofing material.
- Seal the edges of the new material with roof sealant to prevent further leaks.
3.3 Replacing Seals and Caulking
Over time, the seals around vents, skylights, and windows can deteriorate. If you notice cracked or missing caulking, it’s important to replace it to prevent water from seeping in. Use high-quality silicone or butyl rubber caulk for these areas.
Here’s how you can replace the seals:
- Remove the old caulk with a scraper or putty knife.
- Clean the area thoroughly to remove any dirt or residue.
- Apply a generous bead of new caulk to the seal area and smooth it with your finger or a caulk tool.
- Allow the caulk to dry before using your RV again.
4. Preventative Maintenance Tips for Long-Term Protection
Once you've repaired your RV roof, it's important to maintain it to avoid future leaks. Here are some tips for keeping your roof in top condition:
- Regular Inspections: Inspect your roof at least twice a year for signs of wear and tear, especially after long trips or harsh weather.
- Keep It Clean: Remove debris from your roof regularly to prevent water buildup and potential leaks.
- Use a Roof Cover: Consider using a breathable roof cover to protect your RV from harsh UV rays and environmental factors.
- Seal Annually: Apply a fresh layer of sealant to your RV roof once a year to maintain a waterproof barrier.
Taking these steps will help ensure that your RV roof remains in good condition and that leaks become a thing of the past.
If you need assistance with your RV roof or require high-quality repair materials, check out Camping Rural for expert recommendations and products to keep your RV in great shape.



 Junius Ponds Cabins & Campground4.0 (279 reviews)
 USFS Wolf Ford Horse Camp4.0 (25 reviews)
 J&l r v park5.0 (9 reviews)
 Kittatinny Canoes - K-Camp3.0 (632 reviews)
 Woodland Estates Mobile Home Park3.0 (72 reviews)
 Shadow Mountain Mobile Home Pk2.0 (42 reviews)
 10 Must-Visit Campgrounds in the Midwest for Your Next Outdoor Adventure
 Romantic Camping Spots for Couples: Perfect Getaways in Nature
 Ultimate Guide to Off the Grid Camping in Remote Locations
 How to Cook Over a Campfire Safely for an Enjoyable Outdoor Experience
 Vanlife in Winter: My Personal Experience Living on the Road
 From City to Camp: My Journey to Nature and What I Learned